
One of the most important factors to bear in mind when you’re thinking of using a different yarn than the one suggested in a pattern, is that the pattern writer wrote that particular pattern with that specific yarn in mind. So, to get the same drape and loft and look as the garment in the picture on the front of your pattern – you’re going to want to get the best possiblesubstitute yarn. And as you’re about to find out, a yarn is made up of a series of different attributes, so there’s a lot to consider in your substitution.
Say you’ve got a pattern, from years ago, which refers to a discontinued yarn, or one that you’ve downloaded online and you want to work out what other yarns might work well with it, we are here to help you. But as you’ll see, there is quite a lot to consider when substituting yarn. Some people learn best one-on-one and if that’s you, then a private lesson with Alison would be ideal and she can take you through the steps to consider in person. Others of you might prefer to read up on what you need to do – in which case - this blog is for you. At Crumbz, we’re all about teaching you how you can work things out for yourself. So here’s how…
The Ball Band is your Friend
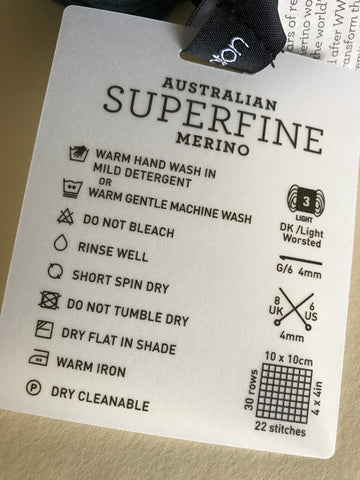
So much information that you’ll need is on the ball band, you just need to know how to read it and in some cases interpret it. Let’s look at it in more detail:
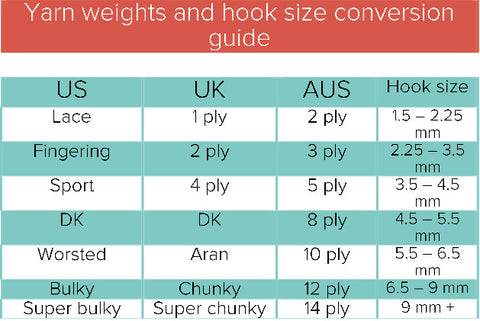
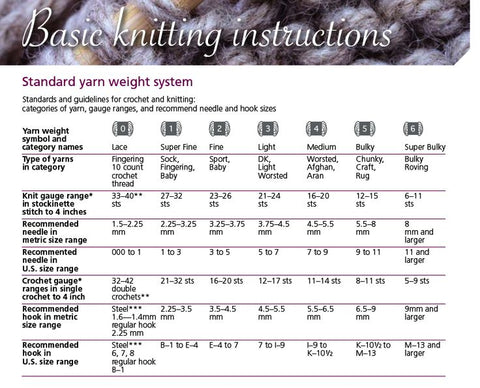
- The ball band tells you what type of yarn it is – and typically, the US/AUS/UK call things by different names just to confuse us even further. Here is a handy conversion chart so you can tell what’s what!
- the band also tells you how many meters that ball of yarn is – which is crucial because if the yarn in your pattern is 80 meters per ball and the yarn you are wanting to substitute it for, is more meters per ball, you’ll need to get fewer balls. It’s quite a calculation though, so I’d check with one of us to make sure you’re going to have enough balls.
- not so long ago here in Australia, every yarn band would have had its ply number on it, from 4 ply through to 20 ply. And we knew where we stood. Not so nowadays – many local brands are now just calling their yarns Chunky or Superfine and not attributing a ply to it, which makes substituting even more of an art form!!
If your pattern refers to an 8 ply yarn – you’d be forgiven for thinking ‘I’ll just find another 8 ply yarn and off I go!’ – but be careful, not all 8 plys are created equally! Look at the fibre content of the recommended yarn, some yarns are pure wool, others a blend of two natural fibres (wool and alpaca) others include man-made yarns such as acrylic, some are thin, some are thick, some are light and lofty, others are dense and heavier, some are blown others twisted. So as you can see there’s a lot to consider with all of these factors when substituting a yarn, even if you’re substituting ply for ply.
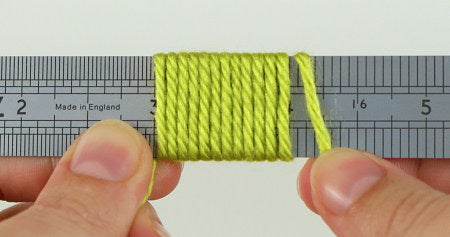
- If the WPI is different – this needs to be factored in too. WPI stands for wraps per inch. Meaning if you got your ruler and wrapped your yarn around the ruler, the wrap per inch is how many times the yarn goes around the ruler within an inch. So, the smaller the WPI number, the thicker the yarn.
- then comes ‘tension’. You see, all yarns have a tension guage, so if your pattern refers to a specific yarn, you need to find out what that yarns’ tension is/was. You might find this link to yarnsub useful!
The gauge – and what that means
You’ve seen those symbols on a ball band, about what temperature to wash your garment, well next to that, is the gauge (with the crossed knitting needles) – it tells you how many stitches to cast on and how many rows to knit to see your tension gauge. (Top tip - add on a few stitches/rows on top of what they recommend, so that when you measure your 10 x 10 square, you are measuring it within the centre of the sample not from an edge, because edges often curl and are therefore not easy to measure accurately.) A good idea is to count your stitches and rows and put a marker in place so it’s really clear where to measure from.
For those of you who like to crochet as well - the gauge is the same for crochet or knitting – ie a 4 mm knitting needle is a 4mm crochet hook.
We all knit at a different tension
And that’s just a fact. We knit at a different tension according to what’s going on in our lives, and what we’re knitting with (what style needles, and yarn) and how long it is since we last knitted. So, it’s essential to create a tension square before embarking on a new project. If you haven’t knitted for while, your tension may be tight to start off with. And you’ll knit differently according to the type of needles you’re knitting with (carbon/bamboo/plastic/circular) insert image. We can’t emphasise this enough – it won’t take you long, but it will save a lot of tears down the track – because extraordinary things happen when you don’t work out your tension – in addition to wanting your garment to fit (!!), a tight knitter might find their tight finished product ‘felts’ when washed, because the fibres are too tight and close to each other.
What if you’re not ‘on tension’ for that yarn?
So your yarn ball band tells you what tension this yarn should be knitted at. According to your tension, you might need to go up a needle size (ie larger needles) or down, depending on the results of your tension square. If you’re a tight knitter (and there’s no judgement here folks, we are what we are!!) then we’d suggest taking you up a needle size for that particular pattern. Alison might also suggest a type of yarn that has more give in it too.
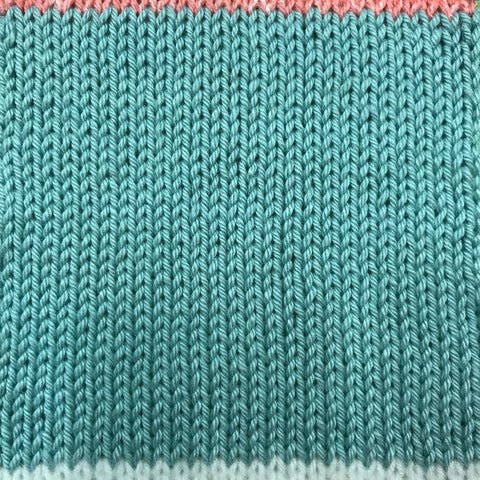
Here is an example of how different yarns knit up.
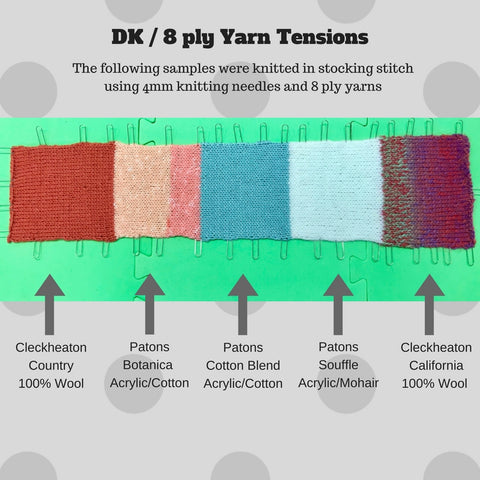
Quite surprising isn't it?! They're all 8 ply but look how differently they knit up?!
An average tension square (average as opposed to tight or loose) will have some spring in it – whereas a tight tension square feels hard and unyielding, vs a loose square which is floppy and doesn’t hold its shape. Same applies for crochet.
Tension changes according to what you’re making too – if you’re making a cushion cover you want that to be firm, but if you’re making a scarf, you want it to be soft so you might go up 1.5 to 2 sizes to ensure your scarf is soft ie from size 6 needles to 7.5 or 8.
Some yarns are easier for beginners to knit with
Just as an aside - if you’re a beginner and reading this, it’s worth noting that lighter coloured yarns are easier to knit with when you’re just starting out, as it’s easier to see the stitch you’re making. And using larger needles is easier too, with a larger ply, ie larger yarn.
So, to recap – here’s a brief summary:
- What ply does the pattern refer to (Chunky, 4ply whatever)
- Convert it according to the country you’re in
- Select your yarn based on the best possible match of fibre content (ie wool for wool, alpaca for alpaca)
- Knit a tension square according to the guage on the pattern’s yarn (work out if you need to adjust your needle size)
Note: if you’ve got a few more stitches in your tension square than you should have, try going up a needle size.
If you’ve way too many stitches, it may be that the yarn simply isn’t right for that pattern.
There is a lot to take in and understand about substituting yarns but we are here to help.
And if you’ve liked this blog and want to learn more or go over any aspect of it in more detail – book a lesson with Alison.